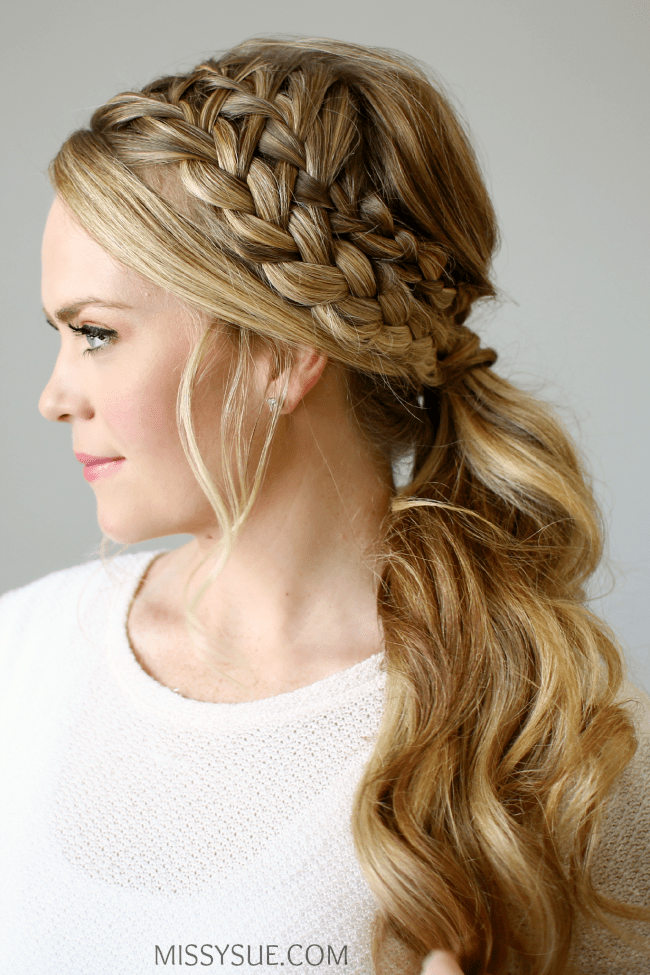

This double braided ponytail looks tricky and intricate but when you break it down it is surprisingly simple. The technique behind this look is one I’ve featured before in several other tutorials and is nearly identical to the Woven ponytail. It’s actually a waterfall braid and french braid combined together and the only difference is the placement of the two braids. I love this hairstyle when I feel like wearing my hair in a ponytail but want to dress it up a bit. Once you get the hang of it I think you will fall in love with it as much as I have.
If you already love this style then be sure to check out my previous tutorials featuring the same technique:
Bonus Dutch Braid versions:

Double Braided Ponytail Supplies:

Double Braided Ponytail Instructions:
- Step 1 / With a part on the right side, separate the hair from the part down to the left ear.
- Step 2 / Tie off the hair at the back so it stays out of the way.
- Step 3 / Divide off a 1″ section of hair along the hairline and clip it out of the way.
- Step 4 / Divide the remaining front section into two equal halves.
- Step 5 / Clip off the forward section to start working on the back half.
- Step 6 / Take a 1″ section of hair, next to the part, and divide it into three pieces for a waterfall braid.
- Step 7 / Cross the side strands over the middle, one at a time, starting with the back strand.
- Step 8 / Next, cross the back strand over the middle and bring in a section of hair, incorporating it into the crossed strand.
- Step 9 /Drop down the front strand and bring in a section of hair from directly underneath it, crossing it over the middle section as a replacement piece.
- Step 10 / Continue braiding the section of hair, dropping the front strand and bringing in a new piece to create a vertical waterfall braid.
- Step 11 / Once the braid reaches the ear, continue in a regular braid, and tie it off with an elastic.
- Step 12 / Next, unpin the forward section, previously pinned and create a french braid incorporating the waterfall strands into the back section of the braid.
- Step 14 / Continue braiding the hair until it reaches the ear, then braid the rest into a regular braid and tie off the end with an elastic band.
- Step 15 / Let down the back hair and sweep it up into a low ponytail.
- Step 16 / Bring the braids into the ponytail and the 1″ section along the hair line, tying it all together with an elastic band.
- Step 17 / Gently pinch and pull the hair above the hair band to create a bit of volume at the back of the crown.
- Step 18 / Take a piece of hair from underneath the ponytail, wrap it around the hair band, and secure it underneath with two bobby pins creating an “x.”
- Step 19 / Grab a curling iron and curl the ends of the ponytail.
- Step 20 / Then finish with a few spritzes of hairspray to hold everything in place.


Hi! My almost ten year old daughter loves your hair styles, especially because you show videos so she can watch. With this double side braid you added a cream of some sort right before you started braiding. Could you please tell me what it is? After braiding her hair in this style this morning it’s pretty apparent we could have used some product with it. Thanks so much.
Hi Jamie, Thank you so much! I love hearing my tutorials are helpful! Yes, I apply a bit of Braid Paste by Oscar Blandi. It’s great for smoothing down flyaways or broken strands (:
Wow! I love this hairstyle! <3 Usually I don't like braids, but this is beautiful!
Hey Missy Sue! Love your tutorials. I’ve been doing a few and keep having the same problem: a gap between my braided hair and the hair that I section off in the back. When I put it up in a ponytail with a side Dutch braid I have scalp showing! Help! Any tips or tricks?! Doesn’t help that I have dark brown hair so you can easily see my white scalp…
Hi Annie, Thanks so much. If you skip a stitch and bring in hair on every other stitch instead it’ll extend the hair towards the ponytail and hide any scalp showing through. Try it out and see how it works (:
Your video teaching very carefully , so I learned a lot , thank you very much
Love this and I’m going to try to do it for my friends wedding! Two questions: 1. Is your hair dirty when you do this (maybe washed the day before?) I have super silky soft hair so I’m afraid it will fall out some. And 2. I have medium brown hair, do you think it will look as good since I don’t have highlights? I have never dyed my hair.
Thanks so much and I can’t wait to try this! I love your site and your hairstyles!!!
Day old hair works a lot better so I would say to try that. I think it will gorgeous on you even without highlights! I bet your hair is amazing if you’ve dyed it before! Good luck!
What hair extensions do you clip on before you start the tutorial? Thank you! Looks beautiful.
They are Luxy hair extensions (:
What a pretty look, I will have to try this out!
xx Kelly
Sparkles and Shoes