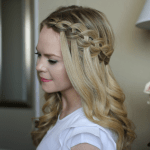

Four strand braids are gorgeous. They’re one of my favorite braids because they look intricate and difficult (which they can be!) but I think they’re definitely worth the struggle.
I saw this technique done by @HairNailsInspiration a few years ago and felt like it was too difficult to figure out. Of course when @AnniesForgetMeKnots posted a recent tutorial with the same method I felt like it was time to step out of my comfort zone and give it a shot.
It seems tricky at first but once you understand the pattern behind the braid you’ll see that it really can be mastered. This headband version is so wearable during the day and I promise you will have people asking you how on earth you did it. Worth a try? I think yes (:
- Four Strand Braid Updo
- Four Strand Waterfall Braid
- Four Strand Headband Braid

Four Strand Dutch Braid Supplies:
- Paddle brush
- Teasing comb
- 2 Hair sectioning clips
- 1-2 Bobby pins
- 1 Clear elastic band
- Firm-hold hairspray
Four Strand Dutch Braid Instructions:
- Step 1 / Always brush through the hair before beginning any style to make sure there aren’t any tangles in the hair.
- Step 2 / Next, part the hair on the left side.
- Step 3 / Then divide off a section of hair from the part down to the right ear.
- Step 4 / Clip the back section away with a sectioning clip.
- Step 5 / Separate out any hair you want to frame the face at the end and clip this out of the way as well.
- Step 6 / Pick up a small horizontal section near the part and split it into four sections.
- Step 7 / Take the far left strand, strand 1, and cross it under the strand next to it, strand 2, over the next one (strand 3), and under the last one (strand 4).
- Step 8 / With the two middle strands (2 & 3), cross strand 2 over strand 3.
- Step 9 / Now add in hair to the far left strand (strand 1) to begin a new stitch of the braid.
- Step 10 / Cross strand 1 under strand 2.
- Step 11 / Next it would go over strand 3 but first pick up a new section of hair near the hairline and add it into strand 3, making sure it’s brought in underneath strand 4.
- Step 12 / Now cross strand 1 over strand 3 and under strand 4.
- Step 13 / Cross strand 2 over strand 3.
- Step 14 / Now add in hair to the new strand 1 and begin a new stitch of the braid crossing it under strand 2.
- Step 15 / Add in hair to strand 3 and cross strand 2 over it and under strand 4.
- Step 16 / Then cross strand 2 over strand 3.
- Step 17 / Now continue braiding the hair until all the hair is brought into the braid.
- Step 18 / Continue working down the section creating a four strand braid, securing the end with a clear elastic band or bobby pin.
- Step 19 / Gently pull on the edges of the braid to make it wider and more full.
- Step 20 / Wrap the braid around the back of the head and pin it behind the left ear.
- Step 21 / Divide off a section of hair on the left side and bring it back towards the braid.
- Step 22 / Carefully tuck the section underneath the braid so it’s held in place by the bobby pin that is pinning down the braid.
- Step 23 / Spray the hair with a firm-hold hairspray to set it.


For me that was really hard. I think I will try it when I am a little bit older, cause I’m only ten. Can you recommend any other websites for me?
First of all you look gorgeous. For me that was really hard. I think I will try it when I am a little bit older, cause I’m only ten. Can you recommend any other websites for me?
Will this work for naturally curly hair? I don’t mean waves, I mean properly horrifyingly amazing curly hair. Could this be achieved, or would the curls cause too many tangles?
Oh my goodness, absolutely gorgeous!
xx Kelly
Sparkles and Shoes