
 The holidays are coming up quick and I’m sure many of you have some parties coming up even sooner! Today I am excited to be partnering with Conair to share a fun get ready with me style tutorial where I show you how I style my hair from start to finish so it’s holiday party ready!
For this tutorial I am using the new InfinitiPro by Conair 3Q® Hair Dryer. This dryer is literally so amazing! It’s a professional quality dryer at a fraction of the price and made drying my hair a complete breeze. This is the only hair dryer you will ever need. My favorite thing about it, besides drying my hair at lightning speed, is that it has 3 heat settings so I can adjust the temperature to gently dry my hair and then change the setting to cold so I can set my style too.Whether you love having a sleek style for everyday or a voluminous blowout for a special event, this would make a great gift for that beauty-obsessed bestie.

For this tutorial I am starting with freshly washed hair because I prefer most of my hairstyles on clean hair. To prep for a quick blow out I’m going to first apply a pump of thickening mousse to my roots. This help create flexible volume so my fine hair looks, and feels thicker.
Next I’m going to apply a small dollop of the a styling serum to help smooth any frizz and tame my flyaways. This also makes my hair really soft and easier to style.
For the blow dry I love to start by blow drying my part and then flipping my head upside down to dry the roots from underneath. This really helps add extra lift and volume right at the root.
Once my hair is about 80% dry I like to start drying it with a round brush. First I divide the hair into sections, clipping up the top, and then place my brush under small sections no larger than the brush. Focusing the dryer at the roots, I slowly rotate the brush under the hair and then slowly brushing down towards the middle of the section.


The ends dry quickest so I like to make sure to concentrate the dryer at the roots and mid-length before quickly going over the very ends last. The titanium ceramic technology in this blow dry has the drying power of a professional dryer so it dries my hair very quickly with minimal damage; something I always look for in a blow dryer.


Working in sections I continue round brushing all of my hair until it’s completely dry. I really love prepping my hair this way because it’s naturally wavy and curly so not only does this blow dyer add lift and volume to my hair, it also smooths and straightens my natural waves so it’s prepped and ready for the next step.
 Once my hair is dry and all smoothed out I’m going to grab my Conair 1” curling iron and add in some curls. Picking up small sections of hair I’m alternating the direction of each curl to helps maintain a bit of volume and also so they don’t combine together into one giant ringlet.
I love styling my hair with curls so whenever I have somewhere fancy to go, like a holiday party, this is always what I do to get ready.
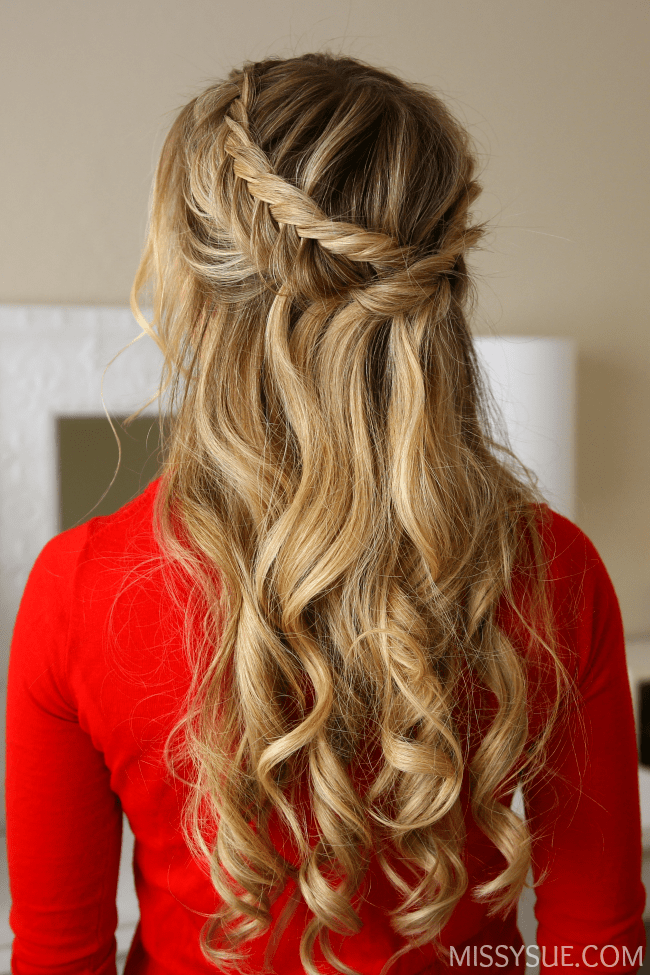
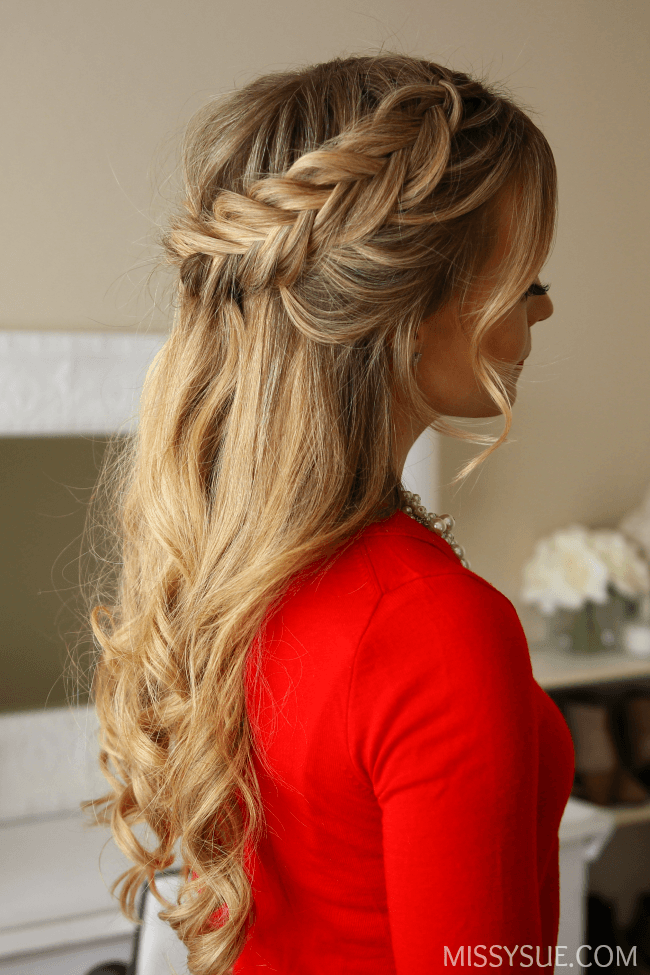
Now that the base of my style is done I’m going to add in some pretty braids. For this style I’ve parted my hair near the center and then I’m going to pick up a small slice near the part. Dividing this piece into three smaller sections I’m going to begin a dutch braid by crossing the right strand under the middle and then the left strand under the middle.
 Now I’m going to combine the back two sections together so I am only working with two sections. Switching to a dutch fishtail braid I’m going to cross small sections from one side under to the opposite side while incorporating new sections into the braid and braid down towards the left ear. Once it reaches the top of the ear I’m going to curve it towards the back of my head continue to bring in new sections to the top of the braid without bringing in any new hair to the bottom side.
When the braid reaches the center of the back of my head, I’m doing a few more stitches of the braid and then securing the end with two criss-crossed bobby pins.
Now repeat the previous steps and create a second dutch fishtail braid on the right side of the head. Then take both braids around the back of the head and lay one over the other and pin them in place with several bobby pins. I used about 3 on each side and made sure they were tucked underneath the hair so you couldn’t see them. Then just remove the bobby pins from the ends of the braids and set the style with a few spritz’s of hairspray!
 Thank you to Conair and Target for sponsoring this post!
I love the harstyles!! Its amazing and thank you for the tutorials!! Happy holidays!
Love from Lebanon.
I love the hairstyles!!! Its amazingg!!!
Love from Lebanon.
Looking so nice!
Enjoy your tutorials every time
Great love from Russia ❤