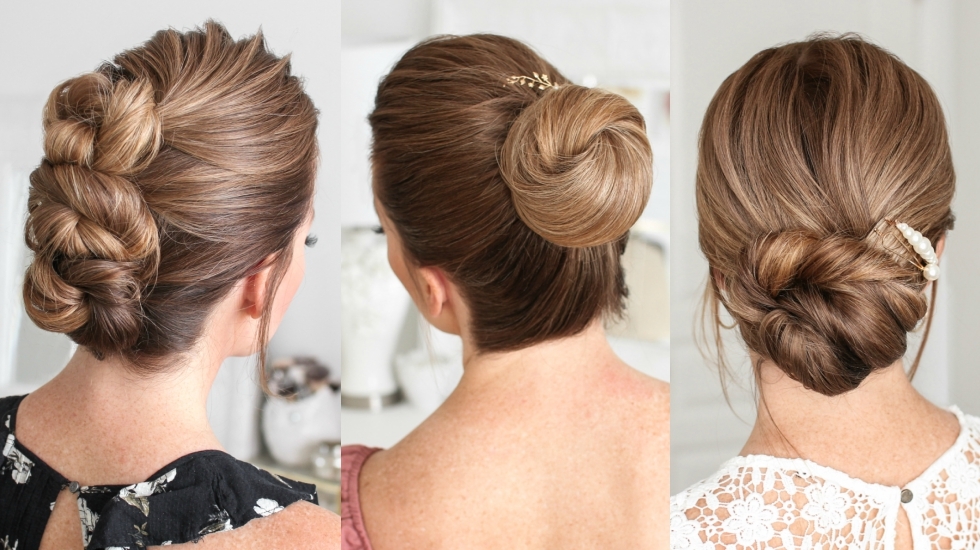
3 Easy Updo Hairstyles Supplies:
High Bun Instructions:
- For the first style, I’m going to brush all of my hair into a high ponytail and tie it off with a hair band.
- Now I’m going to gather the ponytail and starting from the bottom of the hair band I’m going to wrap the hair clock-wise around the hair band.
- Then once the hair wraps all the way around the hair band and is at the bottom again, I’m going to take the ends of the hair and tuck it underneath the base of the ponytail. Then I will pull it up through the center.
- Then I’m going to grab some bobby pins and begin pinning the bun in place.
- I’m just going to grip small pieces of the bun and then slide the bobby pins underneath the hair so they don’t show. I used about three or four bobby pins.
- Now I’m going to take the ends sticking out from the center and continue wrapping them in the same direction as the bun and tuck the very ends underneath the rest of the hair.
- Then I’m going to slide some more bobby pins around the edges of the bun to make sure it’s held in place and won’t come loose.
- Then I’m just going to spray the style with hairspray and smooth my fingers over the bun so it looks clean and sleek.
I love how elegant this style looks, it reminds me of something a ballerina would wear but would also look pretty for any kind of formal event.
Mohawk Buns Instructions:
- For the next hairstyle, I’m going to divide the hair into three sections. For the first section, I’m going to create a part just above my temples and tie off this top section at the back of my head using a clear elastic band.
- I’m going to clip this section out of the way and divide off the second section of hair. This one’s going to be just under my temples. I’m going to tie this section using another elastic directly under the first section at the back of my head.
- I’m going to clip this section out of the way and tie the remaining hair into the third and final section using another clear elastic band under the first two.
- I’m going to tie each of these sections into a knot and you can do this any way that’s easiest for you but I’ll show you how I do mine.
- With the top section, I’m going to take my right pointer finger and place it on top of the hair. I’m going to wrap the hair around my finger with my left hand and then twist my pointer finger clock-wise to twist the hair around my finger.
- Then I’m going to put my thumb through the hole that my pointer finger is in and grab the ends of the hair pulling them through the hole.
- Then I’m just going to lay the knot against my head and slide some bobby pins around the base to pin it in place against my head.
- Again, I’m just grabbing a few hairs with the bobby pins and then sliding them underneath the hair so they don’t show.
- Now I’m going to take the ends from the first bun and combine them with the hair from the second ponytail.
- With this hair I’m going to create a second knot but I’m going to wrap the hair backwards from the first.
- So I’m wrapping the hair around my left finger, twisting my hair to wrap the hair into a twist. Then I’ll place my thumb through the hole and pulling the ends through the hole to create a knot.
- The I’m just going to secure the knot against my head. I’m going to slide some bobby pins around the edges of the bun, hiding the bobby pins underneath the hair.
- Now I’m going to combine the ends from the second knot with the third ponytail and tie this into another knot.
- I’m switching directions again so this hair with wrap around my right hand like the first knot. Then I’ll pull the ends through the hole created with the twist. Then lay the knot against my head underneath the second one and pin it in place with 4 or 5 bobby pins.
Styles like this are some of my very favorites. It’s like a mix between a high bun and low bun. I just love it so much.
Low Bun Instructions:
- For the third style, I’ve got my hair parted on the right side though you could put it wherever you normally prefer.
- I’m just going to divide off a section of hair from my crown and pin this in place at the back of my head.
- Then I’m going to take the side section on the left and drape this over the crown section pinning it with a bobby pin.
- Next I’m going to take the right section and bring this over the other two sections at the back of my head. Then pin it in place with a bobby pin.
- Once that’s all pinned I’m going to pull small sections up and forwards along the crown to add some detailing and texture.
- I’m going to take the hair at the nape of my neck and pin it towards the center of my head. I’m just bringing it across and pinning it in place with bobby pins.
- Then I’m going to combine the rest of the hair together and tie a clear elastic band around it about two or three inches down.
- Now I’m going to wrap the hair up towards the center of my head, tucking the ends around the left side.
- Then to hold the bun in place I’m going to pin the top of the bun. I’m just sliding the bobby pins underneath the bun so they don’t show.
- Then with the ends, on the left side of the bun, I’m going to twist these together and then lay it along the top of the bun.
- Then I pinned it in place with a few more bobby pins, making sure these are hidden underneath the hair.
- To embellish the style a little bit I decided to add some little pearl pins on the right side of the bun.
Thank you so much for watching!