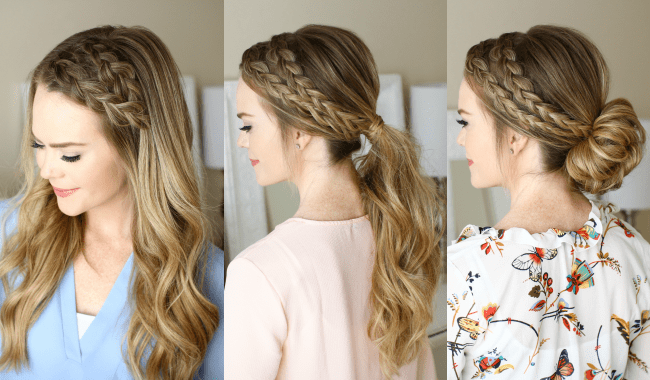

Who’s ready for a 3-in-1 tutorial?! I really love these because they give you a bunch of different hairstyle ideas for a bunch of different days. I actually posted a picture of this double dutch braided headband on instagram over a year ago, gasp! It’s literally taken me forever to film and post a tutorial for it. I really love it though and would definitely say all three versions of this style are my favorite. Which one do you like best? Do you love these 3-in-1 tutorials as much as I do? xo, Missy
P.s. I’m currently listening to “We can hurt together” by Sia and totally loving it (:
Outfit details: BLUE TOP (6 colors + on sale!) | PINK TOP (5 colors!)| PRINTED TOP (old) | LIP LINER (dervish) | LIPSTICK (peach blossom)


Double Dutch Braids 3 Ways Supplies:

Double Dutch Braided Headband Instructions:
- Step 1 / Start by parting the hair on the right side.
- Step 2 / Then create another part about 2” back from the hairline down to the left ear and clip off the back section.
- Step 3 / Pick up a small section of hair near the part and split this into three small pieces for the braid.
- Step 4 / Begin a dutch braid by crossing the side strands under the middle strand.
- Step 5 / Continue the braid down to the temple incorporating new sections into the braid.
- Step 6 / Once the braid reaches the temple, stop adding in new sections and just continue the braid down to the ends.
- Step 7 / Then criss-cross two bobby pins over the bottom so it doesn’t unravel.
- Step 8 / Let down the hair previously clipped up and divide out a similar sized section for the second braid.
- Step 9 / This braid is identical to the first so repeat the previous steps creating a second dutch braid, incorporating hair into the braid, until it reaches the temple.
- Step 10 / Then stop adding in new sections and braid the rest of the section to the bottom in a regular three-strand braid.
- Step 11 / Once both braids are done go back over them and pull on the edges to make them wider.
- Step 12 / Then bring the braids together and pin them against the head right above the left ear. I made sure to lay them underneath the hair from the crown which will help hide the ends of the braids where they’re pinned.
- Step 13 / Now remove the bobby pins from the ends of the braids and unravel the ends.
- Step 14 / Now go back over them again, making them even wider to better help hide the gap in between them.


Double Dutch Braids Ponytail Instructions:
- Step 1 / After finishing both braids combine the rest of the hair together where you’d like your ponytail to sit.
- Step 2 / Then add the braids into the ponytail so they don’t get buried under other hair
- Step 3 / Now tie it all together with a hair band.
- Step 4 / Then remove the bobby pins from the ends of the braids and unravel them.
- Step 5 / To finish this style, wrap a small section of hair around the hair band and secure it underneath with a bobby pin. You can also use a small elastic band which works just as well.

Double Dutch Braids Low Bun Instructions:
- Step 1 / Once both braids are done, combine all of the hair together at the nape of the neck.
- Step 2 / Then remove the bobby pins from the ends of the braids.
- Step 3 / With the hair band over the right hand, wrap it once over the ponytail.
- Step 4 / Then twist it over the right hand again.
- Step 5 / Now spread the ponytail around the hair band, basically finding the center of the ponytail.
- Step 6 / Then wrap the hair band over this base, twist it again and wrap it a second time.
- Step 7 / Now pull on the edges of this base making it bigger until you like the size.
- Step 8 / Pick up the ends that are left sticking out and split it into two sections.
- Step 9 / Loop each section back towards the top of the bun and tuck it into the elastic band.
- Step 10 / Loosen the hair at the crown to add volume and then play around with the bun until you like the way it looks.


Shop the supplies from Double Dutch Braids 3 Ways:
[show_shopthepost_widget id=”2587943″]
Здравствуйте! A Dutch braid is also called an inverted French braid or a reverse French braid. The hair is braided under instead of over like in a standard French braid.
Loved it!!! i always have to watch the bun part a couple of times, its the most difficult part for me!! very creative !!! ????
Thank you! Yes, definitely! Messy buns always take the most practice <3
Such a pretty look for Spring!
xx Kelly
Sparkles and Shoes