
It’s that time of year again! Halloween is coming up quick but all the parties and fun events will be here even sooner! I am super excited about this Harley Quinn tutorial. I really stepped out of my element to become this villain. Watching the batman cartoons growing up, the joker girl was always my very favorite, so of course recreating this updated version was such a blast! What are you planning to be for Halloween this year?

Harley Quinn Halloween Tutorial Makeup Instructions:
- Step 1 / Starting with foundation, I’m mixing two favorites, Estee Lauder Double Wear and Clarins Skin Illusion and I’m using a beauty sponge to apply it all over my face.
- Step 2 / Next up is concealer and I’m using It Cosmetics Bye Bye Under Eye in Light.
- Step 3 / To set the concealer I’m using Rimmel’s Stay Matte powder.
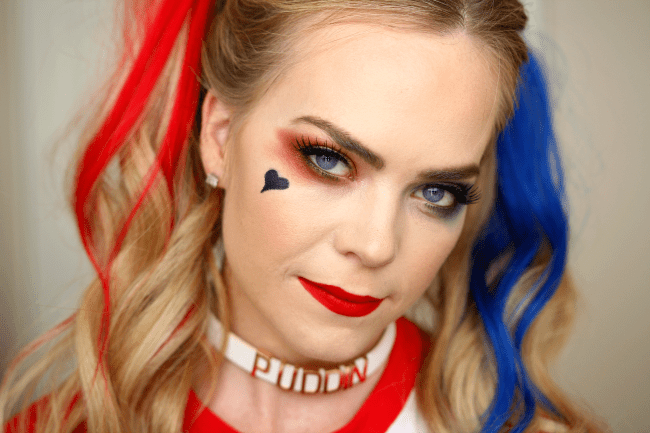
- Step 4 / Then I’m grabbing the It Cosmetics You Sculpted palette and using the soft contour shade I’m going to blend this into the crease as my transition shade.
- Step 5 / For my right eye I’m going start with MAC’s Brick Red and apply this to my crease, blending it inward and up.
- Step 6 / Then I’m going back over the color with MAC Cranberry to deepen up the color.
- Step 7 / Going back to the Brick Red shade I’m bleeding the color down onto the lower lash line and cheekbone area. Then just deepening up the color with Cranberry.
- Step 8 / Now I’m going to do the exact same thing with the left eye using two blue shades. MAC Atlantic Blue and then deepening up the color with MAC Deep Truth.
- Step 9 / Next I’m using a Sigma Gel Liner in the shade Wicked to line my upper lash line. I’m also using a black eyeliner pencil for my lower water line.
- Step 10 / Then I’m going to curl my lashes and apply Smashbox Full Exposure mascara.
- Step 11 / Next I’m applying a pair of false lashes to help the eyes pop.
- Step 12 / Then I’m filling in my brows with the It Cosmetics Universal Brow Pencil.
- Step 13 /Going back to the It Cosmetics You Sculpted Palette and the same soft contour shade to add some color under my cheekbones, along the top of my forehead, under my jaw, and along the sides of my nose.
- Step 14 / To add a bit more color I’m using It Cosmetics Warmth Bronzer on my cheekbones and forehead.
- Step 15 / For blush I’m using NARS Orgasm and then MAC’s Soft & Gentle to highlight my cheekbones.
- Step 16 / Next I’m grabbing an eyeliner pencil and carefully tracing a tiny heart on my cheekbone to fit with the Harley Quinn character.
- Step 17 / To finish off the look I’m lining my lips with the Milani Lip Liner in True Red and going over that with MAC Ruby Woo lipstick. My favorite red lip shade of all time.

Harley Quinn Halloween Tutorial Hair Instructions:
- Step 1 / Start by creating a center part using a rattail comb and continuing the part down the back of the head, tying off the hair on the right side to work with the left first.
- Step 2 / Pull the hair up on the left side to see where you want to tie it off. Then divide off a small section of hair right in front of that spot and clip in the blue clip-in hair extensions placing a small section of hair in between them.
- Step 3 / Once those are clipped in then pull the hair up on this side and tie it off with an elastic band.
- Step 4 / Now repeat the same steps clipping in the red hair extensions and tying the hair up into a second ponytail.
- Step 5 / Spray the hair with a heat protectant spray and then using a 1″ curling iron, curl each ponytail in small sections, alternating the direction to keep them from sticking together.
- Step 6 / To finish off the hair wrap small sections of hair around the elastic bands pinning them underneath with bobby pins to help hide them.
- Step 7 / Set with hairspray and that’s the last step!
Clothing // Choker, Shirt, Essie Russian Roulette, Essie Midnight Cami
That Harley Quinn look is so spot on! You totally rocked this look!